|
I first
read about the J Vice rotary tying vise in a
2003 article in the online version of Fly Fisherman
magazine, co-authored by Hans Weilenmann and Bruce Salzburg. Its
physical appearance appealed to me and
the review written by
Hans was very positive. I immediately contacted the builder, Jay Smit, in South
Africa.
Jay’s Web
site is
www.jvice.com. Contact him directly at
sales@jvice.com if you have questions. Jay is happy to
field all inquiries. This is important since there are no
dealers and it is unlikely that you will have observed,
tested or even touched one of these beautiful vises. My
vise, which arrived in May of 2004 is vise #43 and was only the
second vise shipped to America.
It takes
Jay about a week to complete each order. Unless you request
airmail deliver (currently that’s about $85 including
insurance), you will need to be patient. Surface delivery
to the States
takes about four to six weeks and costs about $32 including
insurance. But believe me, it is worth the wait! Two
hundred dollars (US$200) buys a lot of vise and features in
South Africa.
Ultimately,
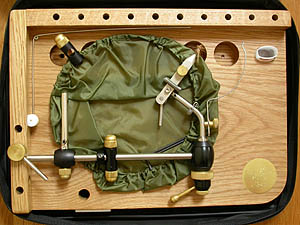
vise #43 arrived at my office wrapped in multiple layers of
bubble wrap, beneath which was a black cordura nylon travel
case about the size of a small laptop computer. (If you
travel with this vise, you will find the pockets inside the
case useful for storing tying tools.)
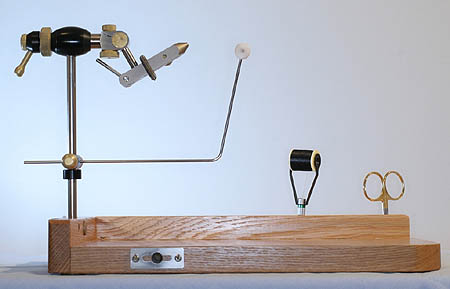
Nicely
packed inside was the vise with materials
clip, adjustable bobbin holder, solid oak tying-platform
with variously sized holes drilled for tools and small
containers, an innovative extension arm for adjustable
height tying, and a nifty nylon waste basket. My kit also
included a gallows tool, which is available for a small
additional price. A nice touch was that Jay sent one of his hand-tied paraloop duns clamped in the vise
jaws. Several other accessories are now available at very
reasonable prices. These include midge jaws, a c-clamp, and
a special accessory for tying salt-water streamers.
Accessories
are nice, but
the more important decision is between the two available
models shown below: (1) the standard model with knuckle-joint arm, or
(2) the bent arm model. I chose the bent arm model because
of its clean lines.
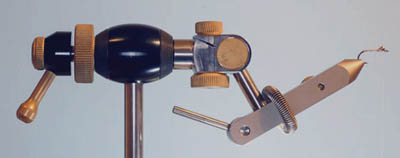 Standard model with knuckle-joint: The
knob on top of the joint is for attachments and
can be removed
for greater hand clearance. Photo courtesy of J Vice.
_400.jpg) Bent-arm model: Holes in arm
allow for three jaw height settings. Photo courtesy of J
Vice.
Bent-arm model: Holes in arm
allow for three jaw height settings. Photo courtesy of J
Vice.
Don’t
forget to tell Jay whether you want the stand-rod diameter
to be 10mm (a non-standard dimension used by only a few
foreign vise makers) or 3/8”. Mine is 3/8” so that I can
add accessories from most other vise builders.
If you tie
left-handed, you will want to mention this to Jay so he can
assemble your wood tying-platform accordingly. The vise
jaws can be reversed at any time for left- or right-handed
tying.
In the
pedestal mode, the arm holds the jaw tips about 8” above the
wood platform, and the stem sits inside a drilled hole
in the wood side rail. It is held solidly in
place by a unique brass cam devise, shown in the photo at
the right. The height of the jaws
on the bent-arm model can be fine-tuned with three jaw
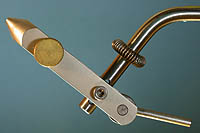
height settings. To make the adjustment, use the supplied Allen wrench to remove
the cap-screw from the back of the jaws (see photo below,
left).
Then, slide the jaw unit up
or down on the shaft until it aligns with one of the
three holes (see photo below, right). Reinsert the screw and
tighten with the Allen wrench.
 |
|
_holes.jpg) |
|
Back side of jaws. Note brass adjustment
knob
and cap-screw |
|
Note the
three jaw height setting discussed above. |
This
height adjustment procedure is a bit
awkward, but I don’t view this as an important
consideration. I have never made this adjustment.
I tie all my flies in the middle setting. For those
tiers who wish to maintain the hook shank on a perfect
x-axis while rotating, of for other reasons you
expect to make frequent height adjustments, I suggest the knuckle-joint model which allows
the jaws to swivel up and down without tools.
Because my
tying desk is a bit high, I favor the extension
arm Jay so cleverly designed. This bar allows the stem
to “hang” over the front of the tying table, so that vise
height can be lowered. This is similar to what can be
accomplished with a c-clamp. The result is a more comfortable tying position for me, with
my arms lower and with the fly at about mid-chest. Either
way, the solid wood tying-platform remains a solid base with
no shake or wobble.
|
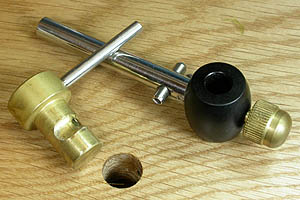
Step 1:
The cam and extension arm.
The cam is inserted in the hole shown.
(The same cam is used for both pedestal mode and
extension arm mode.) |
|
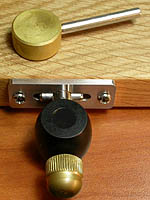
Step 2: The extension arm is
inserted into a hole in the front of the
platform. |
 |
|
 |
|
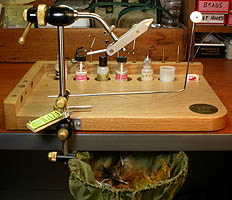
Step 3: This is my set up. Slide
extension arm over the table edge and insert vise stem.
Nylon trash bag slips over end of stem and can be
pivoted under the table when not in use. |
|
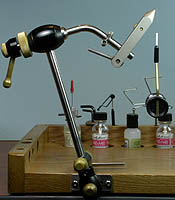
If desired,
you can get a little more room behind small
hooks (perhaps size 22 and smaller) by angling
the stem to one side. |
Jaw
tightness is adjusted with two mechanisms. First, a knurled
brass knob on the far side of the jaw unit opens and closes
the jaws. By adjusting the jaws so they barely touch
the largest hook you expect to use during a tying session, I
have found that I can tie up to four sizes smaller without
touching this knob. (Most recently, I started with
size 4 and worked down to size 12 without further
adjustment.) A small pocket has been designed inside the jaws to secure
larger hooks. Once the hook is inserted into the jaws, the
cam lever will move up or down to lock the hook in
place.
I am a
freshwater tier and fish for trout, panfish and bass. My
hooks range from a size 2 3xl to a size 20 thin-wire dry fly
hook. The jaws work splendidly on these sizes. Jay says
they will hold solidly from size 6/0 to 22. I know one
professional tier who found the vise held firm on a 26; but
he was quick to mention that the thickness of
the jaws gave only marginal access to the back of the hook.
To create more tying room, try tilting the stem to one side
as shown in the photo above. Also, Jay has developed a set of midge jaws,
currently available as a prototype for US$35. Jay will
upgrade any prototype users with the final version for only
the difference in price, yet to be determined.
_400.jpg)
Midge tiers may want to consider the
knuckle-joint standard model because
the midge jaw accessory can be conveniently
installed on this model. Photo courtesy of J Vice.
One
requirement for me is that the vise be able to maintain an
off-angle position while tying, and at the same time be able
to rotate easily. For example, if I want to work on a fly
upside down, the shaft should rotate easily to that angle,
and the fly should “stay put” in a hands-free upside-down
position without further adjustment. This requires a very
precise tightening mechanism. This is accomplished with a large solid brass infinite-adjustment knob. The knob
presses a Vesconite® disc against the aluminum
shaft-housing, operating much like a disc-drag on a fly
reel. Vesconite® is a hard wearing self-lubricating
material used for industrial bushes.
A rather
unique feature is the slanted design to the control handle.
If held between two fingers and thumb, the ball at the end
of the handle allows the tier to rotate the vise in circles
without shifting his/her grip. (You’ll appreciate this when
laying down the chenille body of a woolly bugger!)
_300.jpg)
A few features. Photo from J Vice Web
site, with permission.
The solid
oak tying-platform is 13/16” thick and has a footprint a tad
over 10” x 14”. It has two rails attached with large
screws. The side rail gives support to the vise stem and
the back rail holds tools in predrilled holes. Jay has made
platforms from other woods, so if you have a preference let
him know. The extra cost of a custom platform will depend
on wood type and availability.
The J Vice
is the center of my tying world. Not only do I admire its
rugged good looks, but I
appreciate the rock-solid workmanship and top-quality
materials. The word “over engineered” comes to mind.
That’s a good thing, in my opinion. This vise is simple yet
elegant, and it is built without compromise. A work of art
with excellent functionality.
Peter
Frailey
April, 2005
|
